
Pinterest challenge! DIY chalkboard paint wine glasses
Do you love pinterest?!? I don't think I have met anyone who has said NO to that question. I love pinterest! So much inspiration and creativity floating around there....almost a little too much! I always find that I do waaaay too much pinning, not enough doing! So when I heard about the Summer Pinterest challenge from these lovely ladies, I knew this would be the perfect opportunity to actually make myself DO one of the hundreds of thousands of projects I have pinned this year. (I'm exaggerating obviously...something I rarely do:)

The first project I had in mind was painting my entry way rug. Something I have wanted to do for a while now, but after a busy 4th of July week, a weekend with NO AC in the swealtering heat along with trying to pack for a min vacation....needless to say it didn't get done. Oh well. It will have to wait untill next season's party!
So instead I wanted to share with you a quick and fun summer time project I actually did a while back but never blogged about.

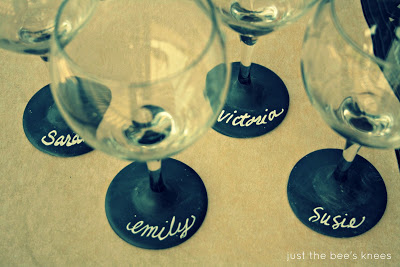
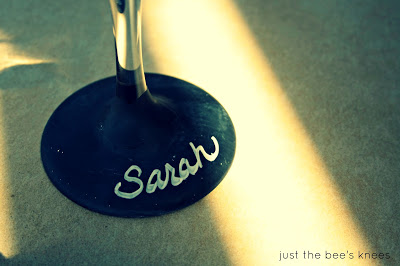
I pinned this image forever ago and thought it was a brilliant idea!! whenever I am at a party and enjoying a glass of wine, I will set it down and loose it. EVERY time. It's ridiculous really. Wine charms don't work....I just forget which charm is mine. (And it has nothing to do with the amount of wine consumed....at least that's what I keep telling myself.) So I thought that if I actually had my name written on my glass, then maybe I would be less apt to drinking out of everyone else's glass.
I headed to my local Dollar Tree and picked up a dozen wine glasses, which are a bargain even if you don't paint them. They are a great shape and weight. The original tutorial used chalk board spray paint, but I had a can of the paint on hand, so I just used that. I lightly sanded the bottom of the glass for added security with adhesion, then painted on 2-3 light coats of the paint using a foam brush. TIP: Don't paint the coats too heavy or you will have drips. After letting them dry for 3 days (following manufacturers directions) they were ready!

Do you love pinning too?!? Leave me the link to your account in the comment section so we can all be sure to check out your boards!
Here's the link to my Pinterest Boards if anyone would like to follow along!
Happy Pinning!

Sharing With:
Pinterest Challenge Hosts:
Kate @ Centsational Girl
Sherry @ Young House Love
Katie @ Bower Power
Michelle @ Ten June
Weekend Wrap up @ Tatertots and Jello
Saturday Nite Special @ Funky Junk Interiors